Trip Notes - Wastewater
Dumping the tanks without soaking your pants
Oct 2010
It's inevitable. If you live in a vehicle and use the facilities, someone is gonna have to dump your business eventually. My guess is that it will probably be you. After you dump the first time, it gets easier every dump, and eventually, you'll be rinsing the black water tank with gray water without even blinking an eye- but don't try it on the first dump...
*Yup, this is weird to be discussing #1 and #2 (and as our 6 year old calls it- #3 when you have to do both). However- if you neglect this part of your RV, you may suffer through problems with blocked tanks, offensive smells inside and outside- and a potential health risk from water supply contamination. Don't worry! It's easy to manage if you have a plan of attack. Soon you'll laugh in the face of waste water management and you'll be teaching the new folks how to handle their hoses.
Start at the beginning, you must fill your tank before you can dump your tank.
Anything that comes out of your body can go into the toilet, but that's it. Select a toilet paper that is 'septic tank safe', or single ply. We usually buy the cheapest single ply paper, and have never purchased the expensive 'RV Only' toilet paper - and haven't had any problems when we stick to our tank procedure. Right after dumping/emptying the tanks, before anyone has used the facilities, we add a half cap full of fabric softener (we buy the cheapest one for this), and about 1/4 cup of whatever powdered laundry detergent we're using at the time. While adding those 2 items into the toilet bowl, we flush about 4-6 times, to create a base of water to keep things wet in the black water tank. Problems arise when things dry out in this tank and begin to stick. The water keeps it wet, the fabric softener helps keep things soft and reduces adhesion to the tank by solids, and the detergent adds a wash cycle as you roll down the highway. We have never used a chemical RV waste tank additive, and this system has never failed us- - and it has probably saved us a lot of money along the way.
No matter what system you use to monitor your tank levels, be aware of the signs of a waste tank becoming full: water drips from the overflow pipe (if so equipped); water is visible in the toilet when you flush or the level is visible on a sight gauge on the holding tank. Generally, it's good to plan to dump anytime you use all of, or get close to using all of your fresh water. Gray water tanks will back up into the shower or sinks when they are full. Try to dump before you see these late signs of overfull waste water tanks. There is a learning curve with new and used water tank monitors, while you learn what 3/4 full really means!
Black water tanks generally hold the waste from the toilet only. Gray water tanks will collect the water from the shower and sinks and are generally not offensive, in fact, when you dump them you'll see lots of suds from the soap mixed in with the water that has been gently sudsed up with every bump you hit while driving. The gray water tank will fill up faster than the black water tank. It is possible that you will find a location that it is acceptable to dump a gray water tank on the ground (farming areas have allowed this in our experience). You will never find it acceptable (and it is illegal) to dump a black water tank on the ground- although you do have choices with how you dump the tank.
Most RVers hook up a 3-4" soft drain hose to their waste tank, and insert the other end into the sewer dump, then let gravity draw the tank contents out.
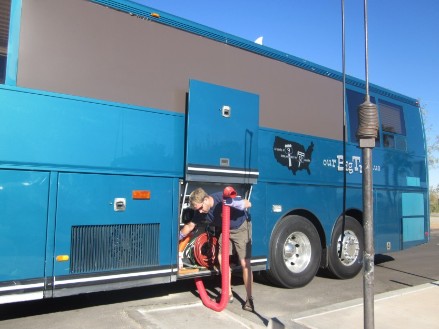
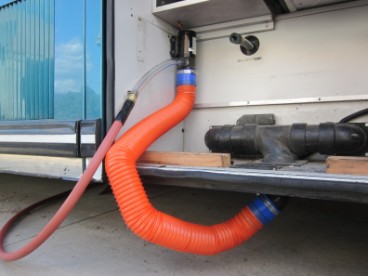
Performing the optional gray water tank rinse, I'm lifting the hose above the water level to force
the released gray water into the black water tank to flush. It's scary, but works every time.
We use the standard technique 95% of the time we are on the road, but we have a secret weapon for unique circumstances (like at our own home). We have attached a macerator pump to a short length of 3" hose that hooks up just like the standard method, but it grinds and impels the waste up to 100' through a garden hose that's attached to the other end of the macerator pump. This method is valuable if you are at home or a location that does not have a sewer dump or clean out close enough to your RV for standard dumping. The macerator pump setup will cost between $250 for you-build-it setup, to $600 for a system in a handy plastic storage box. We have a red garden hose permanently connected to our macerator pump so there is no doubt what it is for and there is no chance of cross contamination with fresh water supply hoses (which are white). We have not used this pump as much as we expected we would have to, but it's nice to know it's available.
All this talk about 'the standard method'- so what is it?
1) Pull your RV up to the dump station so your waste tank outlet is close enough to reach with the hose you have (we keep 2-10' lengths on board).Turn off the vehicle, this will take a few minutes.
2) Do any clean tasks before donning your rubber gloves (open compartment doors, fish for keys in your pocket, etc)
3) Put on rubber gloves. We use reusable kitchen gloves that get sanitized every time we use them. Another good option would be a box of disposable gloves.
4) Connect your waste drain hose to the output of the waste tank, then drop the adapter into the sewer dump opening. Sometimes these are covered with a cap, which when lifted will rest on top of your drain adapter holding it in place.
5) Open the dirtiest tank valve first (black water) and allow it to run until empty. It will empty more completely if the tank is full or nearly full. Some tanks have flush inlets, which allow you to fill the tank before you dump it to get the maximum pressure behind the dumping process.
[optional] Flush the black water tank with gray water by lifting the hose carefully out of the dump opening and holding it above the level of the waste water. With the black water valve still open and the hose held up, open the gray water valve and allow that tank to flow quickly into the black water tank. Close the gray water valve when the flow slows down, then close the black water valve. Watch out! There's stuff in the hose, which should be gray water, but... You quickly insert the hose into the dump, then open the black water valve, releasing the new supply of gray/rinse water. May repeat as long as you have gray water available- I usually do it twice.
6) When the black water tank is empty, close the valve, and open the gray water valve. Close when empty.
7) With both valves closed, allow the water to drain through the hose another few seconds, then carefully remove the drain hose, keeping it pointed up as you bring it out from under the RV and lift it up.
8) Rinse the hose with the facility rinse hose, or your own short length designated exclusively for cleaning. We run water into the hose then lift it up high so all water runs through clear, then rinse off the outside of the hose and around the adapter and once the adapter is out of the dump opening, rinse the area around the dump.
9) Replace the drain hose into storage.
10) Using a sanitizing solution in a spray bottle (we use 200ppm bleach), spray off your gloves plus any work surfaces that you will use during fresh water filling (hose bib: around threads, handle, inside spigot, etc), also spray the hose threads, inside hose connection etc. This small amount of sanitizing spray may be rinsed off after sitting for a minute on the surface.
11) Connect your white fresh water supply hose to the supply and RV fresh tank and fill.
12) Store fresh water hoses separately from any waste water supplies or gloves.
Remember! These methods work for us, but may not for you. Try them and change to suit your needs.

Hold everything! We told you how to go, but not where to go!
We've had great success locating suitable dump sites with the Sanidumps.com website. With over 15,000 listings, there's one near you. We have contributed dozens of entries that we've come across on our own, and you can, too. Check it out before you start driving.
Want to learn more about RVing?
Read our Trip Notes and learn from our experiences- good & bad.
Trip Notes Index (click here)